This integration is powered by Singer's FrontApp tap. For support, visit the GitHub repo or join the Singer Slack.
Front integration summary
Stitch’s Front integration replicates data using the Front API. Refer to the Schema section for a list of objects available for replication.
Front feature snapshot
A high-level look at Stitch's Front integration, including release status, useful links, and the features supported in Stitch.
| STITCH | |||
| Release Status |
Released |
Supported By | |
| Stitch Plan |
Free |
Singer GitHub Repository | |
| DATA SELECTION | |||
| Table Selection |
Supported |
Column Selection |
Supported |
| REPLICATION SETTINGS | |||
| Anchor Scheduling |
Supported |
Advanced Scheduling |
Unsupported |
| Table-level Reset |
Unsupported |
Configurable Replication Methods |
Unsupported |
| TRANSPARENCY | |||
| Extraction Logs |
Supported |
Loading Reports |
Supported |
Connecting Front
Front setup requirements
To set up Front in Stitch, you need:
-
A Premium or Enterprise Front plan. These plans include API access, which is required to use Stitch’s Front integration. Refer to Front’s pricing page for more info.
Step 1: Generate a Front API token
- Sign into your Front account.
- Click the user menu (your icon) in the top left corner of the page.
- Click Settings.
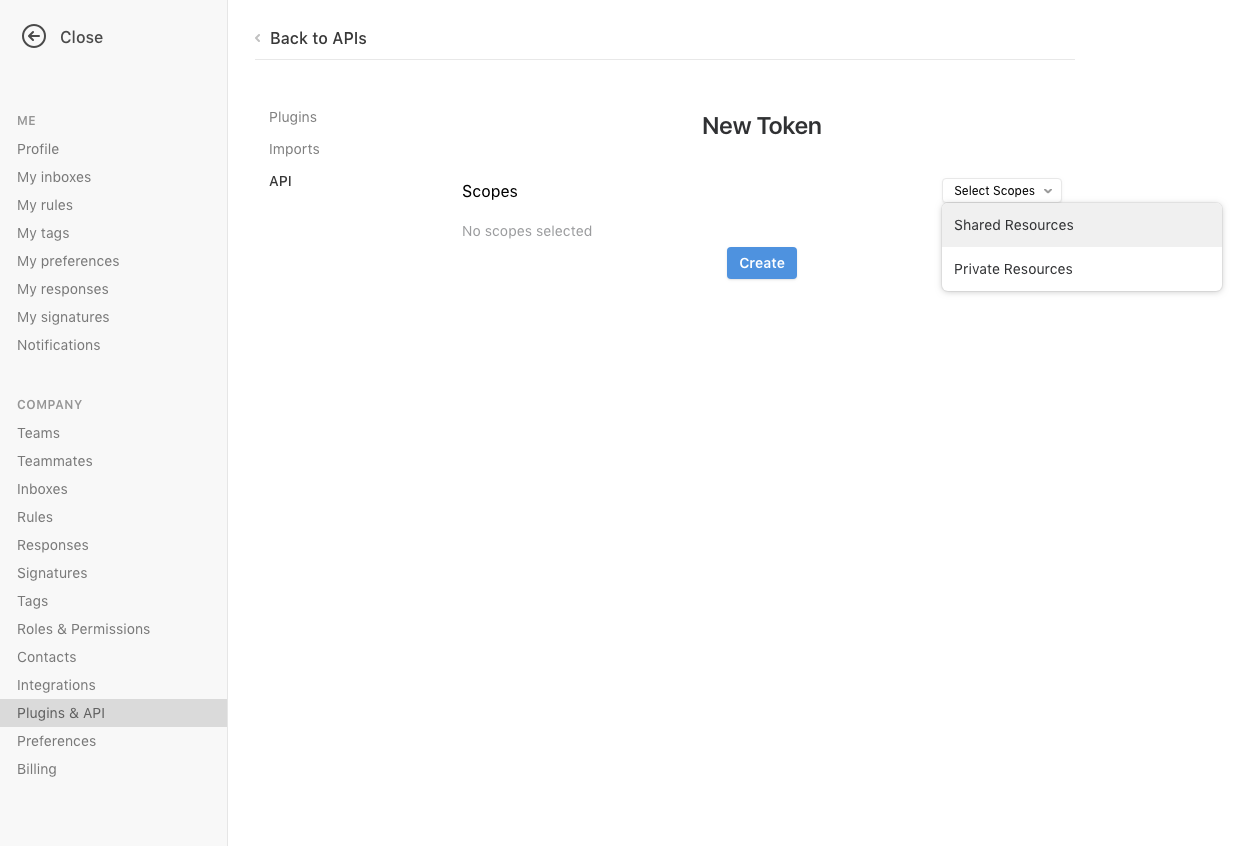
- In the Company section on the left side of the page, click Plugins & API.
- On the page that displays, click API.
- Click the New Token button.
- On the New Token page, click the Select Scopes dropdown and select the type of resources you want to replicate data from.
- Click Create to create the API token.
Keep the token handy - you’ll need it in the next step to complete the setup.
Step 2: Add Front as a Stitch data source
- Sign into your Stitch account.
-
On the Stitch Dashboard page, click the Add Integration button.
-
Click the Front icon.
-
Enter a name for the integration. This is the name that will display on the Stitch Dashboard for the integration; it’ll also be used to create the schema in your destination.
For example, the name “Stitch Front” would create a schema called
stitch_frontin the destination. Note: Schema names cannot be changed after you save the integration. - In the API Token field, paste the Front API token you generated in Step 1.
- From the Incremental Range dropdown, select one of the following options:
- Daily - Data will be aggregated on a daily basis.
- Hourly - Data will be aggregated on an hourly basis.
Step 3: Define the historical sync
The Sync Historical Data setting will define the starting date for your Front integration. This means that data equal to or newer than this date will be replicated to your data warehouse.
Change this setting if you want to replicate data beyond Front’s default setting of 1 year. For a detailed look at historical replication jobs, check out the Syncing Historical SaaS Data guide.
Step 4: Create a replication schedule
In the Replication Frequency section, you’ll create the integration’s replication schedule. An integration’s replication schedule determines how often Stitch runs a replication job, and the time that job begins.
Front integrations support the following replication scheduling methods:
To keep your row usage low, consider setting the integration to replicate less frequently. See the Understanding and Reducing Your Row Usage guide for tips on reducing your usage.
Step 5: Set tables and columns to replicate
To complete the setup, you’ll need to select the tables and columns you want to replicate to your data warehouse.
Check out the Schema section to learn more about the available tables in Front and how they replicate.
- In the list of tables that displays - or in the Tables to Replicate tab, if you skipped this step during setup - locate a table you want to replicate.
-
To track a table, click the checkbox next to the table’s name. A green checkmark means the table is set to replicate.
-
To track a column, click the checkbox next to the column’s name. A green checkmark means the column is set to replicate.
- Repeat this process for all the tables and columns you want to replicate.
- When finished, click the Finalize Your Selections button at the bottom of the screen to save your selections.
Note: If you change these settings while a replication job is still in progress, they will not be used until the next job starts.
Initial and historical replication jobs
After you finish setting up Front, its Sync Status may show as Pending on either the Stitch Dashboard or in the Integration Details page.
For a new integration, a Pending status indicates that Stitch is in the process of scheduling the initial replication job for the integration. This may take some time to complete.
Initial replication jobs with Anchor Scheduling
If using Anchor Scheduling, an initial replication job may not kick off immediately. This depends on the selected Replication Frequency and Anchor Time. Refer to the Anchor Scheduling documentation for more information.
Free historical data loads
The first seven days of replication, beginning when data is first replicated, are free. Rows replicated from the new integration during this time won’t count towards your quota. Stitch offers this as a way of testing new integrations, measuring usage, and ensuring historical data volumes don’t quickly consume your quota.
Front table schemas
Table and column names in your destination
Depending on your destination, table and column names may not appear as they are outlined below.
For example: Object names are lowercased in Redshift (CusTomERs > customers), while case is maintained in PostgreSQL destinations (CusTomERs > CusTomERs). Refer to the Loading Guide for your destination for more info.
team_table
| Replication Method : |
Key-based Incremental |
Replication Key |
analytics_date |
|
Primary Key |
analytics_range : teammate_v : analytics_date |
API endpoint : |
The team_table table contains a list of team member statistics since the last completed replication job through the most recent iteration of the defined Incremental Range (day or hour).
This table will include team members from all teams in your Front account.
Note: During the historical replication job, all increments since the Start Date will be replicated. This will result in the first record for this table being an aggregated record across all team members.
|
analytics_range
The range the analytics pertain to. |
|
teammate_v
The team member’s ID. |
|
analytics_date
The date the analytics pertain to. |
|
avg_first_reaction_time_p
The team member’s average first reaction time for the previous period. |
|
avg_first_reaction_time_v
The team member’s average first reaction time for the current period. |
|
avg_message_conversations_p
The team member’s average number of message conversations for the previous period. |
|
avg_message_conversations_v
The team member’s average number of message conversations for the current period. |
|
avg_reaction_time_p
The team member’s average reaction time for the previous period. |
|
avg_reaction_time_v
The team member’s average reaction time for the current period. |
|
num_composed_p
The team member’s number of composed messages for the previous period. |
|
num_composed_v
The team member’s number of composed messages for the current period. |
|
num_conversations_p
The team member’s number of conversations for the previous period. |
|
num_conversations_v
The team member’s number of conversations for the current period. |
|
num_messages_p
The team member’s number of messages for the previous period. |
|
num_messages_v
The team member’s number of messages for the current period. |
|
num_replied_p
The team member’s number of replies for the previous period. |
|
num_replied_v
The team member’s number of replies for the current period. |
|
num_sent_p
The team member’s number of sent messages for the previous period. |
|
num_sent_v
The team member’s number of sent messages for the current period. |
|
teammate_id
|
|
teammate_p
|
|
teammate_url
The team member’s URL in Front. |
| Related | Troubleshooting |
Questions? Feedback?
Did this article help? If you have questions or feedback, feel free to submit a pull request with your suggestions, open an issue on GitHub, or reach out to us.