This integration is powered by Singer's Amplitude tap. For support, visit the GitHub repo or join the Singer Slack.
Amplitude integration summary
Stitch’s Amplitude integration relies on the Amplitude Query product add-on, which utilizes a Snowflake database to store data.
Amplitude integrations can replicate event and merged user ID data. Refer to the Schema section for more info.
Amplitude feature snapshot
A high-level look at Stitch's Amplitude integration, including release status, useful links, and the features supported in Stitch.
| STITCH | |||
| Release Status |
Released |
Supported By | |
| Stitch Plan |
Free |
Singer GitHub Repository | |
| DATA SELECTION | |||
| Table Selection |
Supported |
Column Selection |
Supported |
| REPLICATION SETTINGS | |||
| Anchor Scheduling |
Supported |
Advanced Scheduling |
Unsupported |
| Table-level Reset |
Unsupported |
Configurable Replication Methods |
Unsupported |
| TRANSPARENCY | |||
| Extraction Logs |
Supported |
Loading Reports |
Supported |
Connecting Amplitude
Amplitude setup requirements
To set up Amplitude in Stitch, you need:
-
To be on an Amplitude Enterprise or Growth plan. Amplitude requires this to access the Query product add-on.
-
To have purchased the Amplitude Query product add-on. Query is an Amplitude-managed Snowflake database, which Stitch’s integration replicates data from.
Step 1: Retrieve your Snowflake credentials
Stitch’s Amplitude integration connects to your Amplitude-managed Snowflake database to replicate data.
To connect Stitch to Amplitude, you’ll need to retrieve your Snowflake credentials from Amplitude. Reach out to Amplitude support or your Amplitude Success Manager to get your credentials.
When you receive your credentials, you can move onto the next step.
Step 2: Add Amplitude as a Stitch data source
- Sign into your Stitch account.
-
On the Stitch Dashboard page, click the Add Integration button.
-
Click the Amplitude icon.
-
Enter a name for the integration. This is the name that will display on the Stitch Dashboard for the integration; it’ll also be used to create the schema in your destination.
For example, the name “Stitch Amplitude” would create a schema called
stitch_amplitudein the destination. Note: Schema names cannot be changed after you save the integration. - In the Amplitude Snowflake Username field, enter your Snowflake username.
- In the Amplitude Snowflake Password field, enter the Snowflake user’s password.
- In the Amplitude Snowflake Account field, enter the Snowflake account.
- In the Amplitude Snowflake Warehouse field, enter the name of the Snowflake warehouse.
- In the Amplitude Snowflake Database field, enter the name of the Snowflake database.
Step 3: Create a replication schedule
In the Replication Frequency section, you’ll create the integration’s replication schedule. An integration’s replication schedule determines how often Stitch runs a replication job, and the time that job begins.
Amplitude integrations support the following replication scheduling methods:
To keep your row usage low, consider setting the integration to replicate less frequently. See the Understanding and Reducing Your Row Usage guide for tips on reducing your usage.
Initial and historical replication jobs
After you finish setting up Amplitude, its Sync Status may show as Pending on either the Stitch Dashboard or in the Integration Details page.
For a new integration, a Pending status indicates that Stitch is in the process of scheduling the initial replication job for the integration. This may take some time to complete.
Initial replication jobs with Anchor Scheduling
If using Anchor Scheduling, an initial replication job may not kick off immediately. This depends on the selected Replication Frequency and Anchor Time. Refer to the Anchor Scheduling documentation for more information.
Free historical data loads
The first seven days of replication, beginning when data is first replicated, are free. Rows replicated from the new integration during this time won’t count towards your quota. Stitch offers this as a way of testing new integrations, measuring usage, and ensuring historical data volumes don’t quickly consume your quota.
Amplitude table schemas
Stitch’s Amplitude replicates two types of tables: Events and merged user IDs.
For each project in your Amplitude account, a set of these tables will be available for replication. Stitch will append a project’s ID to each table name to make them easily identifiable. For example: If a project has an ID of 168342, the events table for the project will be named events_168432.
You can identify which tables are for a specific project by comparing the ID in the table name to the projects in your Amplitude account. You can access this page in your Amplitude account by clicking the User menu (top right corner) > Settings > Projects.
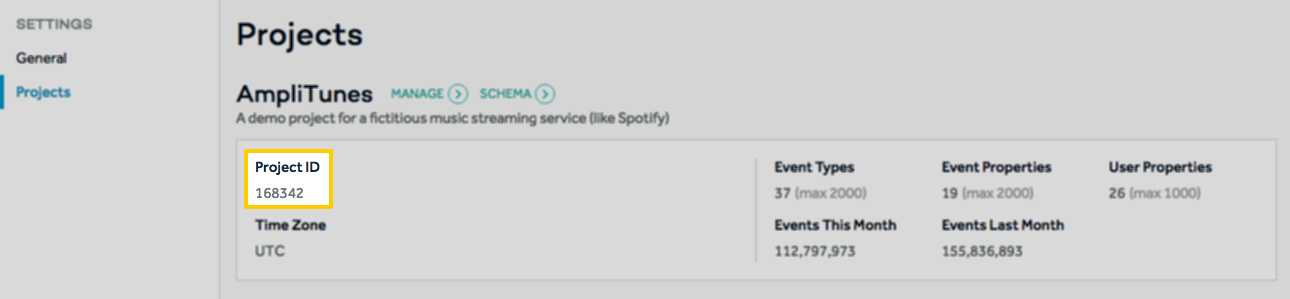
Table and column names in your destination
Depending on your destination, table and column names may not appear as they are outlined below.
For example: Object names are lowercased in Redshift (CusTomERs > customers), while case is maintained in PostgreSQL destinations (CusTomERs > CusTomERs). Refer to the Loading Guide for your destination for more info.
events_[project_id]
| Replication Method : |
Key-based Incremental |
Replication Key |
event_time |
|
Primary Key |
uuid |
Official docs : |
events_[project_id] tables contain info about the events logged in your Amplitude projects.
Note: Each event table will have the project ID appended. For example: If a project has an ID of 168342, the events table for the project will be named events_168432.
|
uuid
The unique event ID. |
|
event_time
The timestamp, which is the Amplitude calculates this as:
This is used in Amplitude to organize events in charts. |
|
adid
The Android/Google Play Services advertising ID. |
|
amplitude_event_type
This is a legacy field. Use |
|
amplitude_id
An internal Amplitude ID used to count unique users. For example: |
|
app
The project ID found in your project’s Amplitude Settings page. |
|
city
The city where the event took place. |
|
client_event_time
The timestamp of when the device logged the event. |
|
client_upload_time
The timestamp of when the device uploaded the event. |
|
country
The country where the event took place. |
|
data
Dictionary where certain fields such as Depending on the destination you’re using, you can use that destination’s available JSON functions to parse the data in this column. Click the links below to view that destination’s JSON function documentation: |
|
device_brand
The brand of device used in the event. For example: |
|
device_carrier
The mobile carrier of the device used in the event. For example: |
|
device_family
The family of the device used in the event. For example: |
|
device_id
The specific device identifier. |
|
device_manufacturer
The manufacturer of the device used in the event. For example: |
|
device_model
The model of the device used in the event. For example: |
|
device_type
The type of the device used in the event. For example: |
|
dma
The designated marketing area (DMA). For example: `San Francisco-Oakland-San Jose, CA |
|
event_id
A counter that distinguishes events. |
|
event_properties
Details about the event. Depending on the destination you’re using, you can use that destination’s available JSON functions to parse the data in this column. Click the links below to view that destination’s JSON function documentation: |
|
event_type
The assigned type of the event. For example: |
|
followed_an_identity
If |
|
groups
Details about the groups associated with the event. Refer to Amplitude’s documentation for more info. Depending on the destination you’re using, you can use that destination’s available JSON functions to parse the data in this column. Click the links below to view that destination’s JSON function documentation: |
|
idfa
The iOS ID for Advertiser. |
|
ip_address
The IP address. |
|
location_lat
The latitude. |
|
location_lng
The longitude. |
|
os_name
The name of the OS used in the event. For example: |
|
os_version
The version of the OS used in the event. For example: |
|
paying
If |
|
region
The region where the event took place. |
|
server_upload_time
The timestamp of when the Amplitude servers received the event. |
|
session_id
The session start time, in milliseconds since epoch. |
|
start_version
The app version the user was first tracked on. |
|
user_creation_time
The timestamp of the user’s first event. |
|
user_id
An ID for the user, specified by you. |
|
user_properties
Details about the user associated with the event. Depending on the destination you’re using, you can use that destination’s available JSON functions to parse the data in this column. Click the links below to view that destination’s JSON function documentation: |
|
version_name
The app version. |
merge_ids_[project_id]
| Replication Method : |
Key-based Incremental |
Replication Key |
merge_event_time |
|
Primary Key |
amplitude_id : merge_server_time : merged_amplitude_id : merge_event_time |
Official docs : |
merge_ids_[project_id] tables contain info about merged users. These are users whose records have been merged with other user records to eliminate duplicates.
For example: If an anonymous user logs events anonymously before signing in, they will go from being anonymous to a recognized user. Without merging the user’s records, it’ll look like two users with two sets of events, rather than one user completing a series of events.
For more info on how Amplitude handles merging users, refer to their documentation.
Note: Each table will have the project ID appended. For example: If a project has an ID of 168342, the merged ID table for the project will be named merge_ids_168432.
|
amplitude_id
The Amplitude being merged into a user’s original Amplitude ID. |
|
merge_server_time
The server time when the user’s new Amplitude was associated with their original Amplitude ID. |
|
merged_amplitude_id
The originally assigned Amplitude ID when the user was first created. |
|
merge_event_time
The time when the user’s new Amplitude ID was associated with their original Amplitude ID. |
| Related | Troubleshooting |
Questions? Feedback?
Did this article help? If you have questions or feedback, feel free to submit a pull request with your suggestions, open an issue on GitHub, or reach out to us.