This integration is powered by Singer's Amazon S3 tap and certified by Stitch. Check out and contribute to the repo on GitHub.
For support, contact Stitch support.
Amazon S3 CSV feature snapshot
A high-level look at Stitch's Amazon S3 CSV integration, including release status, useful links, and the features supported in Stitch.
| STITCH | |||
| Release Status |
Released |
Supported By | |
| Stitch Plan |
Free |
Supported Versions |
n/a |
| Singer GitHub Repository | |||
| CONNECTION METHODS | |||
| SSH Connections |
Unsupported |
SSL Connections |
Unsupported |
| REPLICATION SETTINGS | |||
| Anchor Scheduling |
Supported |
Advanced Scheduling |
Unsupported |
| Table-level Reset |
Unsupported |
Configurable Replication Methods |
Unsupported |
| REPLICATION METHODS | |||
| Log-based Replication |
Unsupported |
Key-based Replication |
Supported |
| Full Table Replication |
Unsupported |
||
| DATA SELECTION | |||
| Table Selection |
Supported |
Column Selection |
Supported |
| View Replication |
Unsupported |
||
| TRANSPARENCY | |||
| Extraction Logs |
Supported |
Loading Reports |
Supported |
Connecting Amazon S3 CSV
Amazon S3 CSV setup requirements
To set up Amazon S3 CSV in Stitch, you need:
-
An Amazon Web Services (AWS) account. Signing up is free - click here or go to
https://aws.amazon.comto create an account if you don’t have one already. -
Permissions in AWS Identity Access Management (IAM) that allow you to create policies, create roles, and attach policies to roles. This is required to grant Stitch authorization to your S3 bucket.
-
To verify that column names in CSV files adhere to your destination’s length limit for column names. If a column name exceeds the destination’s limit, the destination will reject the column. Compliant columns will persist to the destination.
Column name limits vary by destination:
-
Amazon S3 - Not applicable to this destination
-
BigQuery - Limited to 128 characters characters
-
Azure SQL Data Warehouse - Limited to 128 characters characters
-
Panoply - Limited to 115 characters characters
-
PostgreSQL - Limited to 59 characters characters
-
Redshift - Limited to 115 characters characters
-
Snowflake - Limited to 251 characters characters
-
Step 1: Retrieve your Amazon Web Services account ID
- Sign into your Amazon Web Services (AWS) account.
- Click the user menu, located between the bell and Global menus in the top-right corner of the page.
- Click My Account.
-
In the Account Settings section of the page, locate the Account Id field:
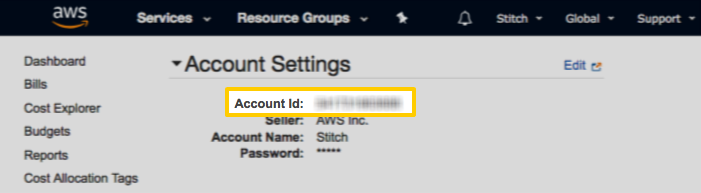
Keep this handy - you’ll need it to complete the next step.
Step 2: Add Amazon S3 CSV as a Stitch data source
- If you aren’t signed into your Stitch account, sign in now.
-
On the Stitch Dashboard page, click the Add Integration button.
- Locate and click the Amazon S3 icon.
-
Fill in the fields as follows:
-
Integration Name: Enter a name for the integration. This is the name that will display on the Stitch Dashboard for the integration; it’ll also be used to create the schema in your destination.
For example, the name “Stitch Amazon S3 CSV” would create a schema called
stitch_amazon_s3_csvin the destination. Note: The schema name cannot be changed after the integration is saved. -
S3 Bucket: Enter the name of bucket you want to replicate data from. Enter only the bucket name: No URLs,
https, or S3 parts. For example:com-test-stitch-bucket -
AWS Account ID: Paste the AWS account ID you retrieved in Step 1.
-
Step 3: Configure tables
Next, you’ll indicate which CSV file(s) you want to include for replication. You can include a single CSV file, or map several CSV files to a table.
In the following sections, we’ll walk you through how to configure a table in Stitch.
Tips for setting up CSV files
For the best results:
-
Each file should have a header row with names that adhere to your destination’s limits for column names. If a column name exceeds the destination’s limit, the destination will reject the column.
-
If including multiple files in a table, each file should have the same header row. Including multiple files in a single table depends on the search pattern you define in the next step.
Note: This is not the same as configuring multiple tables. See the search pattern section below for examples.
Step 3.1: Define the table's search settings
In this step, you’ll tell Stitch which files in your S3 bucket you want to replicate data from. To do this, you’ll use the Search Pattern and Directory fields.
Step 3.1.1: Define the Search Pattern
The Search Pattern field defines the search criteria Stitch should use for selecting and replicating CSV files. This field accepts regular expressions, which can be used to include a single file or multiple CSV files.
The search pattern you use depends on how data for a particular entity is updated. Consider these examples:
| Scenario | Single file, periodically updated | Multiple files, generated daily |
| How updates are made |
A single CSV file is periodically updated with new and updated customer data. |
A new CSV file is created every day that contains new and updated customer data. Old files are never updated after they’re created. |
| File name |
|
|
| Search pattern |
Because there will only ever be one file, you could enter the exact name of the file in your S3 bucket: |
To ensure new and updated files are identified, you’d want to enter a search pattern that would match all files beginning with |
| Matches |
|
|
When creating a search pattern, keep the following in mind:
- Special characters such as periods (
.) have special meaning in regular expressions. To match exactly, they’ll need to be escaped. For example:.\ - Stitch uses Python for regular expressions, which may vary in syntax from other varieties. Try using PyRegex to test your expressions before saving the integration in Stitch.
Step 3.1.2: Limit file search to a specific directory
The Directory field limits the location of the file search Stitch performs during replication jobs. When defined, Stitch will only search for files in this location and select the ones that match the search pattern.
To define a specific location in the S3 bucket, enter the directory path into the Directory field. For example: data-exports/lists. Note: This field is not a regular expression.
While using this field is optional, limiting the search to a single location may make extraction more efficient.
Step 3.2: Define the table's name
In the Table Name field, enter a name for the table. Keep in mind that each destination has its own rules for how tables can be named. For example: Amazon Redshift table names can’t exceed 127 characters.
If the table name exceeds the destination’s character limit, the destination will reject the table entirely. Refer to the documentation for your destination for more info about table naming rules.
Step 3.3: Define the table's Primary Key
In the Primary Key field, enter one or more header fields (separated by commas) Stitch can use to identify unique rows. For example:
account_id,date
If undefined, Stitch will load data into the table in an append-only fashion. This means that existing rows in the destination won’t be updated, but will be appended to the end of the table. Refer to the Primary Keys and Append-Only Replication section below for more info and examples.
Step 3.4: Specify datetime fields
In the Specify datetime fields field, enter one or more header fields (separated by commas) that should appear in the destination table as datetime fields instead of strings. For example:
created_at,updated_at
If columns are not specified and values cannot be parsed as dates, Stitch will load them as nullable strings. Refer to the Determining data types section for more info on how Stitch identifies data types.
Step 3.5: Configure additional tables
If you want to add another table, click the Configure another table? link below the Specify datetime fields field. Otherwise, move onto the Sync historical data section.
Stitch doesn’t enforce a limit on the number of tables that you can configure for a single integration.
Step 4: Define the historical sync
For example: You’ve added a customers.*\csv search pattern and set the integration’s historical Start Date to 1 year. During the initial replication job, Stitch will fully replicate the contents of all files that match the search pattern that have been modified in the past year.
During subsequent replication jobs, Stitch will only replicate the files that have been modified since the last job ran.
As files included in a replication job are replicated in full during each job, how data is added to updated files can impact your row count. Refer to the Incremental Replication for Amazon S3 CSV section for more info on initial and subsequent replication jobs for Amazon S3 CSV.
Step 5: Create a replication schedule
In the Replication Frequency section, you’ll create the integration’s replication schedule. An integration’s replication schedule determines how often Stitch runs a replication job, and the time that job begins.
Amazon S3 CSV integrations support the following replication scheduling methods:
To keep your row usage low, consider setting the integration to replicate less frequently. See the Understanding and Reducing Your Row Usage guide for tips on reducing your usage.
Step 6: Grant access to your bucket using AWS IAM
Next, Stitch will display a Grant Access to Your Bucket page. This page contains the info you need to configure bucket access for Stitch, which is accomplished via an IAM policy and role.
Note: Saving the integration before you’ve completed the steps below will result in connection errors.
Step 6.1: Create an IAM policy
An IAM policy is JSON-based access policy language to manage permissions to bucket resources. The policy Stitch provides is an auto-generated policy unique to the specific bucket you entered in the setup page.
For more info about the top-level permissions the Stitch IAM policy grants, click the link below.
| Permission Name | Operation | Operation Description |
| s3:GetObject | GET Object |
Allows for the retrieval of objects from Amazon S3. |
| HEAD Object |
Allows for the retrieval of metadata from an object without returning the object itself. |
|
| s3:ListBucket | GET Bucket (List Objects) |
Allows for the return of some or all (up to 1,000) of the objects in a bucket. |
| HEAD Bucket |
Used to determine if a bucket exists and access is allowed. |
To create the IAM policy:
- In AWS, navigate to the IAM service by clicking the Services menu and typing IAM.
- Click IAM once it displays in the results.
- On the IAM home page, click Policies in the menu on the left side of the page.
- Click Create Policy.
- In the Create Policy page, click the JSON tab.
- Select everything currently in the text field and delete it.
- In the text field, paste the Stitch IAM policy.
- Click Review policy.
- On the Review Policy page, give the policy a name. For example:
stitch_s3 - Click Create policy.
Step 6.2: Create an IAM role for Stitch
Required permissions
To complete this step, you need the following AWS IAM permissions: CreateRole and AttachRolePolicy. Refer to Amazon’s documentation for more info.
Roles can’t be used for multiple integrations
If you’re creating multiple Amazon S3 CSV integrations, you’ll need to complete this step for each integration you’re connecting.
The Role Name Stitch uses to connect to the Amazon S3 bucket is unique to the integration. Attempting to re-use a role for multiple integrations will cause connection errors.
In this step, you’ll create an IAM role for Stitch and apply the IAM policy from the previous step. This will ensure that Stitch is visible in any logs and audits.
To create the role, you’ll need the Account ID, External ID, and Role Name values provided on the Stitch Grant Access to Your Bucket page.
- In AWS, navigate to the IAM Roles page.
- Click Create Role.
- On the Create Role page:
- In the Select type of trusted entity section, click the Another AWS account option.
- In the Account ID field, paste the Account ID from Stitch. Note: This isn’t your AWS account ID from Step 1 - this is the Account ID that displays in Stitch on the Grant Access to Your Bucket page.
- In the Options section, check the Require external ID box.
- In the External ID field that displays, paste the External ID from the Stitch Grant Access to Your Bucket page:
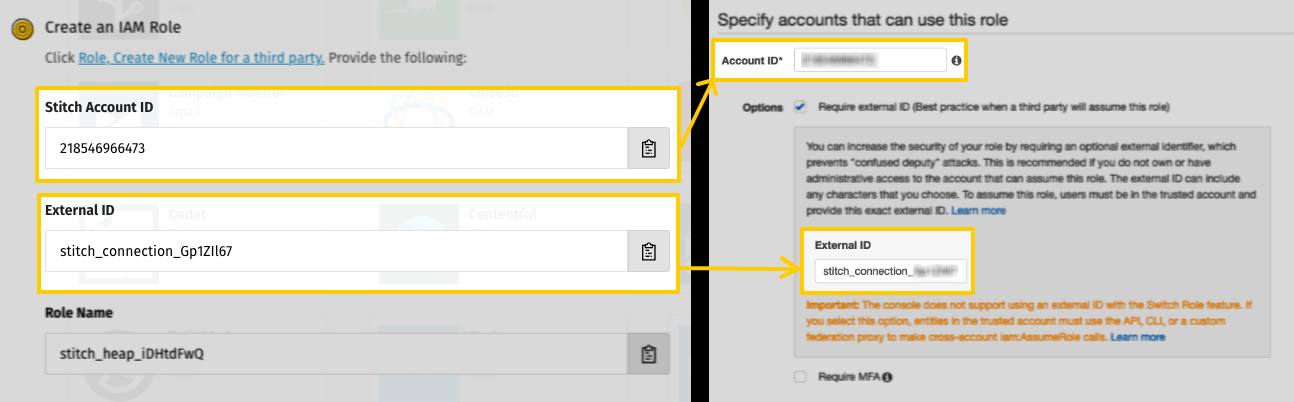
- Click Next: Permissions.
- On the Attach permissions page:
- Search for the policy you created in Step 6.1.
- Once located, check the box next to it in the table.
- Click Next: Tags.
- If you want to enter any tags, do so on the Add tags page. Otherwise, click Next: Review.
- On the Review page:
-
In the Role name field, paste the Role Name from the Stitch Grant Access to Your Bucket page:
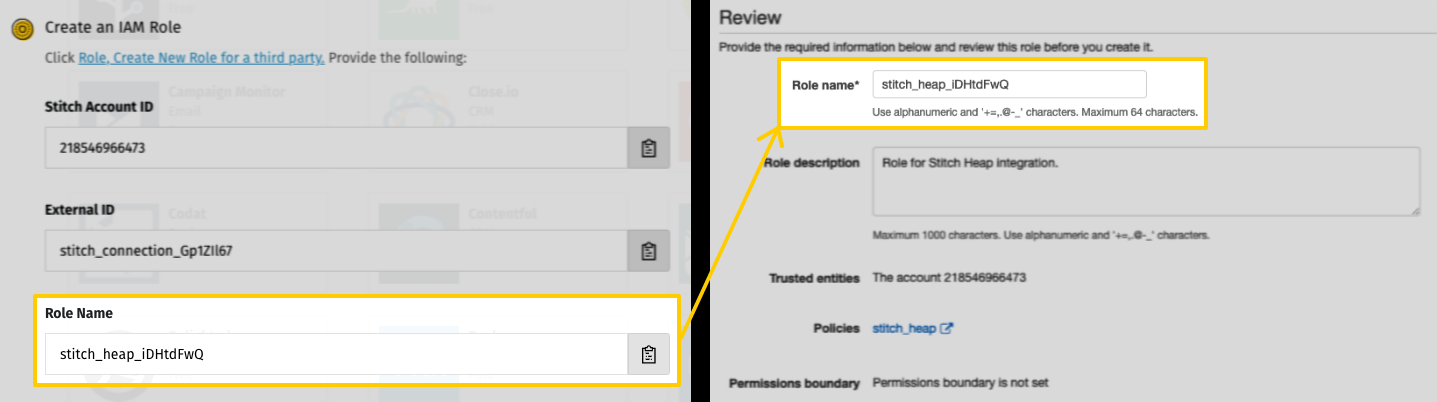
Remember: Role names are unique to the Stitch Amazon S3 CSV integration they’re created for. Attempting to use the same role for multiple integrations will cause connection errors.
- Enter a description in the Role description field. For example:
Stitch role for Amazon S3 CSV integration. - Click Create role.
-
Step 6.3: Check and save the connection in Stitch
After you’ve created the IAM policy and role, you can save the integration in Stitch. When finished, click Check and Save.
Step 7: Select data to replicate
The last step is to select select the tables and columns you want to replicate.
When you track a table, you’ll also need to define its Replication Key.
You can select tables and columns by:
- In the Integration Details page, click the Tables to Replicate tab.
- Locate a table you want to replicate.
- Click the checkbox next to the object’s name. A green checkmark means the object is set to replicate.
- If there are child objects, they’ll automatically display and you’ll be prompted to select some.
-
After you set a table to replicate, the Settings page will display. Note: When you track a table, by default all columns will also be tracked.
-
In the Settings page, define the table’s Replication Method and, if using Key-based Incremental Replication, its Replication Key.
-
Repeat this process for every table you want to replicate.
- Click the Finalize Your Selections button to save your data selections.
Initial and historical replication jobs
After you finish setting up Amazon S3 CSV, its Sync Status may show as Pending on either the Stitch Dashboard or in the Integration Details page.
For a new integration, a Pending status indicates that Stitch is in the process of scheduling the initial replication job for the integration. This may take some time to complete.
Initial replication jobs with Anchor Scheduling
If using Anchor Scheduling, an initial replication job may not kick off immediately. This depends on the selected Replication Frequency and Anchor Time. Refer to the Anchor Scheduling documentation for more information.
Free historical data loads
The first seven days of replication, beginning when data is first replicated, are free. Rows replicated from the new integration during this time won’t count towards your quota. Stitch offers this as a way of testing new integrations, measuring usage, and ensuring historical data volumes don’t quickly consume your quota.
Amazon S3 CSV Replication
In this section:
- How data types are determined
- How new and updated data is identified and replicated
- How Primary Keys affect loading data
Determining data types
To determine a column’s data type, Stitch will analyze the first 1,000 lines of (up to) the first five files included for a given table.
Stitch’s Amazon S3 CSV integration will load data from CSV files and type it as one of the following data types:
-
DATETIME- If a value can’t be parsed as a date, Stitch will load the column as a nullablestring. To ensure dates are typed properly, specify them during setup. -
INTEGER -
NUMBER -
STRING
Incremental Replication for Amazon S3 CSV
While data from Amazon S3 CSV integrations is replicated using Key-based Incremental Replication, the behavior for this integration differs subtly from other integrations.
The table below compares Key-based Incremental Replication and Replication Key behavior for Amazon S3 CSV to that of other integrations.
| Amazon S3 CSV | Other integrations | |
| What's used as a Replication Key? |
The time a file is modified. |
A column or columns in a table. |
| Are Replication Keys inclusive? |
No. Only files with a modification timestamp value greater than the last saved bookmark are replicated. |
Yes. Rows with a Replication Key value greater than or equal to the last saved bookmark are replicated. |
| What's replicated during a replication job? |
The entire contents of a modified file. |
Only new or updated rows in a table. |
Primary Keys and Append-Only Replication
For destinations that support upserts (that is, updating existing rows), Stitch uses Primary Keys to de-dupe data during loading. Primary Keys are used to identify unique rows within a table and ensure that only the most recently updated version of that record appears in your data warehouse.
If Primary Keys aren’t specified during setup, Stitch will load data using Append-Only Replication. This means that existing rows in the destination won’t be updated, but instead appended to the end of the table.
Additionally, Stitch will append a column (__sdc_primary_key) to the table to function as a Primary Key. Note: Appending this column will not enable Stitch to de-dupe data, as a unique value will be inserted every time a row is loaded, regardless of whether it’s ever been replicated before. This means that a record can have multiple __sdc_primary_key values, each of them unique.
| Related | Troubleshooting |
Questions? Feedback?
Did this article help? If you have questions or feedback, feel free to submit a pull request with your suggestions, open an issue on GitHub, or reach out to us.