This integration is powered by Singer's PostgreSQL tap and certified by Stitch. Check out and contribute to the repo on GitHub.
For support, contact Stitch support.
Important: Heroku as an input data source
This article describes how to connect Heroku as an input data source.
If you want to connect a Heroku instance as a destination, refer to the Connecting a Self-Hosted Heroku Destination guide.
Heroku feature snapshot
A high-level look at Stitch's Heroku (v15-10-2015) integration, including release status, useful links, and the features supported in Stitch.
| STITCH | |||
| Release Status |
Released |
Supported By | |
| Stitch Plan |
Free |
Supported Versions |
9.3+ |
| Singer GitHub Repository | |||
| CONNECTION METHODS | |||
| SSH Connections |
Unsupported |
SSL Connections |
Supported |
| REPLICATION SETTINGS | |||
| Anchor Scheduling |
Unsupported |
Advanced Scheduling |
Unsupported |
| Table-level Reset |
Supported |
Configurable Replication Methods |
Supported |
| REPLICATION METHODS | |||
| Log-based Replication |
Unsupported |
Key-based Replication |
Supported |
| Full Table Replication |
Supported |
||
| DATA SELECTION | |||
| Table Selection |
Supported |
Column Selection |
Supported |
| View Replication |
Supported |
||
| TRANSPARENCY | |||
| Extraction Logs |
Unsupported |
Loading Reports |
Supported |
Connecting Heroku
Step 1: Locate the database connection details in Heroku
First, you’ll retrieve the Heroku database’s connection details. This info will be used to connect Stitch to your Heroku database.
- Sign into your Heroku account.
- Click the app that contains the database you want to connect to Stitch. This will open the app’s dashboard page.
- Locate the Installed add-ons setion and click the Heroku Postgres database you want to connect to Stitch. This will open the database’s dashboard page.
- Click the Settings tab.
-
Click the View Credentials… button. This will display the database credentials:
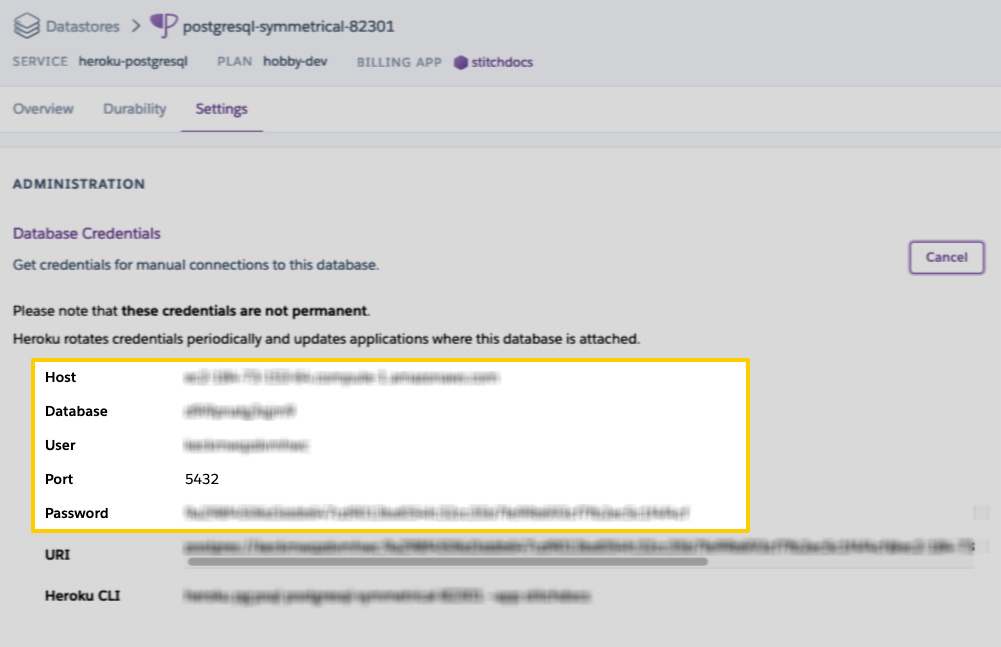
Leave this page open for now - you’ll need it to wrap things up.
Step 2: Connect Stitch
In this step, you’ll complete the setup by entering the database’s connection details and defining replication settings in Stitch.
Step 2.1: Define the database connection details
- If you aren’t signed into your Stitch account, sign in now.
-
On the Stitch Dashboard page, click the Add Integration button.
- Locate and click the Heroku icon.
-
Fill in the fields as follows:
-
Integration Name: Enter a name for the integration. This is the name that will display on the Stitch Dashboard for the integration; it’ll also be used to create the schema in your destination.
For example, the name “Stitch Heroku” would create a schema called
stitch_herokuin the destination. Note: The schema name cannot be changed after the integration is saved. -
Host (Endpoint): Paste the Host address from the Heroku Database Settings page into this field.
-
Port: Enter the port used by the instance. The default is
5432. -
Username: Paste the User name from the Heroku Database Settings page into this field.
-
Password: Paste the Password from the Heroku Database Settings page into this field.
-
Database: Paste the Database name from the Heroku Database Settings page into this field.
-
Step 2.2: Define the SSL connection details
Because Heroku enforces SSL by default, you don’t need to take any further action to encrypt your data. Skip to the next step.
Step 2.3: Create a replication schedule
In the Replication Frequency section, you’ll create the integration’s replication schedule. An integration’s replication schedule determines how often Stitch runs a replication job, and the time that job begins.
Heroku integrations support the following replication scheduling methods:
To keep your row usage low, consider setting the integration to replicate less frequently. See the Understanding and Reducing Your Row Usage guide for tips on reducing your usage.
Step 3: Select data to replicate
The last step is to select select the tables and columns you want to replicate.
When you track a table, you’ll also need to define its Replication Method and, if using Key-based Incremental Replication, its Replication Key.
You can select tables and columns by:
- In the Integration Details page, click the Tables to Replicate tab.
- Locate a table you want to replicate.
- Click the checkbox next to the object’s name. A green checkmark means the object is set to replicate.
- If there are child objects, they’ll automatically display and you’ll be prompted to select some.
-
After you set a table to replicate, the Settings page will display. Note: When you track a table, by default all columns will also be tracked.
-
In the Settings page, define the table’s Replication Method and, if using Key-based Incremental Replication, its Replication Key.
-
Repeat this process for every table you want to replicate.
- Click the Finalize Your Selections button to save your data selections.
Initial and historical replication jobs
After you finish setting up Heroku, its Sync Status may show as Pending on either the Stitch Dashboard or in the Integration Details page.
For a new integration, a Pending status indicates that Stitch is in the process of scheduling the initial replication job for the integration. This may take some time to complete.
Initial replication jobs with Anchor Scheduling
If using Anchor Scheduling, an initial replication job may not kick off immediately. This depends on the selected Replication Frequency and Anchor Time. Refer to the Anchor Scheduling documentation for more information.
Free historical data loads
The first seven days of replication, beginning when data is first replicated, are free. Rows replicated from the new integration during this time won’t count towards your quota. Stitch offers this as a way of testing new integrations, measuring usage, and ensuring historical data volumes don’t quickly consume your quota.
| Related | Troubleshooting |
Questions? Feedback?
Did this article help? If you have questions or feedback, feel free to submit a pull request with your suggestions, open an issue on GitHub, or reach out to us.