This integration is powered by Singer's Postgres tap and certified by Stitch. Check out and contribute to the repo on GitHub.
For support, contact Stitch support.
Important: Google CloudSQL PostgreSQL as an input data source
This article describes how to connect Google CloudSQL PostgreSQL as an input data source.
If you want to connect a Google CloudSQL PostgreSQL instance as a destination, refer to the Connecting a Self-Hosted Google CloudSQL PostgreSQL Destination guide.
Google CloudSQL PostgreSQL feature snapshot
A high-level look at Stitch's Google CloudSQL PostgreSQL (v1.0) integration, including release status, useful links, and the features supported in Stitch.
| STITCH | |||
| Release Status |
Released |
Supported By | |
| Stitch Plan |
Free |
Supported Versions |
9.3+ |
| Singer GitHub Repository | |||
| CONNECTION METHODS | |||
| SSH Connections |
Unsupported |
SSL Connections |
Unsupported |
| REPLICATION SETTINGS | |||
| Anchor Scheduling |
Supported |
Advanced Scheduling |
Supported |
| Table-level Reset |
Supported |
Configurable Replication Methods |
Supported |
| REPLICATION METHODS | |||
| Log-based Replication |
Unsupported |
Key-based Replication |
Supported |
| Full Table Replication |
Supported |
||
| DATA SELECTION | |||
| Table Selection |
Supported |
Column Selection |
Supported |
| View Replication |
Supported |
||
| TRANSPARENCY | |||
| Extraction Logs |
Supported |
Loading Reports |
Supported |
Connecting Google CloudSQL PostgreSQL
Google CloudSQL PostgreSQL setup requirements
To set up Google CloudSQL PostgreSQL in Stitch, you need:
-
Permissions in PostgreSQL that allow you to create users. This is required to create a database user for Stitch.
-
To be running PostgeSQL 9.3+ or greater. PostgreSQL 9.3.x is the minimum version Stitch supports for PostgreSQL integrations.
Step 1: Configure database connection settings
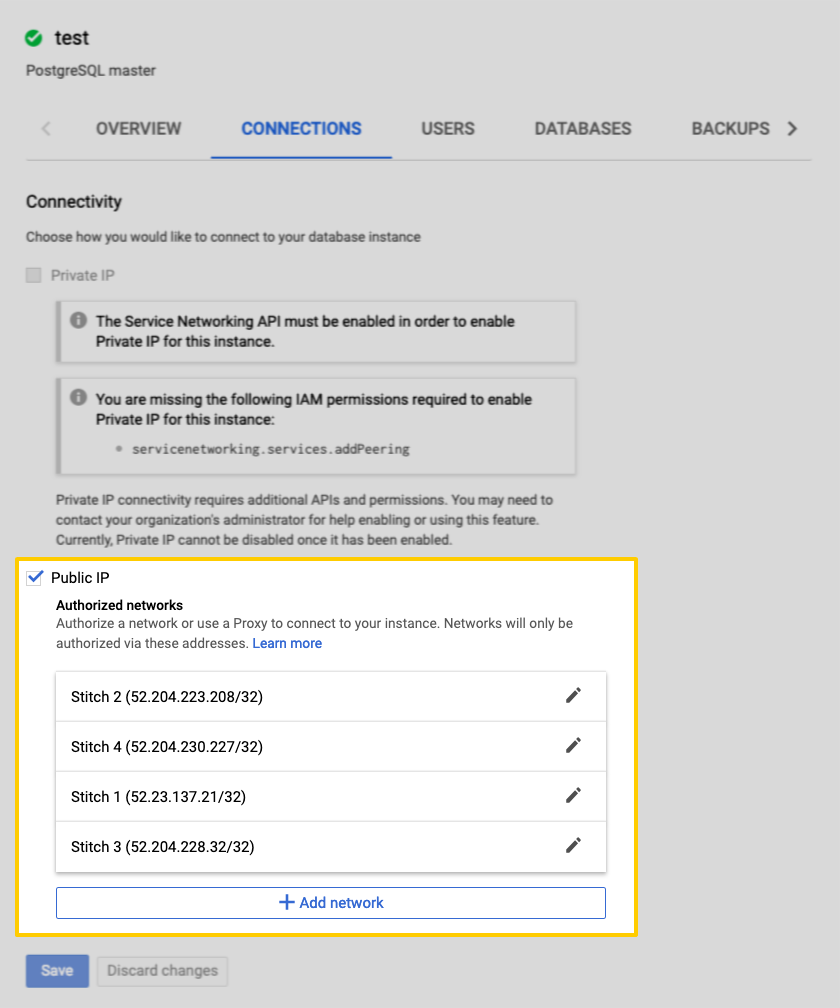
For Stitch to successfully connect with your CloudSQL instance, you’ll need to add our IP addresses to the database’s authorized networks list.
- Sign into your Google Cloud Platform account.
- Navigate to the Cloud SQL Instances page.
- Click the instance name to open its details page.
- Click the Connections tab.
- Locate the Public IP section.
-
For each of the following IP addresses, complete the following:
- Click + Add network.
- In the Name field, enter a name for the IP address. For example:
Stitch 1for the first IP address,Stitch 2for the second, and so on. -
In the Network field, paste one of the following IP addresses:
-
52.23.137.21/32
-
52.204.223.208/32
-
52.204.228.32/32
-
52.204.230.227/32
-
- Click Done.
- Repeat these steps until all of Stitch’s IP addresses have been added.
- When finished, click Save to update the instance.
Step 2: Create a Stitch database user
In this step, you’ll create a dedicated database user for Stitch. This will ensure Stitch is visible in any logs or audits, and allow you to maintain your privilege hierarchy.
Your organization may require a different process, but the simplest way to create this user is to execute the following query when logged into the Google CloudSQL PostgreSQL database as a user with the right to grant privileges.
Note: The user performing this step should also own the schema(s) that Stitch is being granted access to.
- Log into your database.
-
Create a database user named
stitch, replacing<password>with a password:CREATE USER stitch WITH ENCRYPTED PASSWORD '<password>' -
Grant the
stitchuserCONNECTprivileges to the database, replacing<database_name>with the name of a database you want to connect Stitch to:GRANT CONNECT ON DATABASE <database_name> TO stitch -
Grant the
stitchuser schema usage privileges, replacing<schema_name>with the name of a schema you want to replicate data from:GRANT USAGE ON SCHEMA <schema_name> TO stitch -
Grant the
stitchuserSELECTprivileges on the tables in the schema:GRANT SELECT ON ALL TABLES IN SCHEMA <schema_name> TO stitch -
Alter the schema’s default privileges to grant
SELECTprivileges on tables tostitch. This is required to ensure that objects created in the schema after connecting to Stitch will remain accessible to thestitchuser:ALTER DEFAULT PRIVILEGES IN SCHEMA <schema_name> GRANT SELECT ON TABLES TO stitch - If you want to replicate data from multiple databases or schemas, repeat steps 3 - 6 as needed.
See the Privileges list tab for an explanation of why these permissions are required by Stitch.
In the table below are the database user privileges Stitch requires to connect to and replicate data from a Google CloudSQL PostgreSQL database.
| Privilege name | Reason for requirement |
| CONNECT |
Required to connect successfully to the specified database. |
| USAGE |
Required to access the objects contained in the specified schema. |
| SELECT |
Required to select rows from tables in the specified schema. |
| ALTER DEFAULT PRIVILEGES |
Required to ensure that objects created in the schema after connecting to Stitch will be accessible by the Stitch database user. |
Step 3: Connect Stitch
In this step, you’ll complete the setup by entering the database’s connection details and defining replication settings in Stitch.
Step 3.1: Locate the database connection details in Google
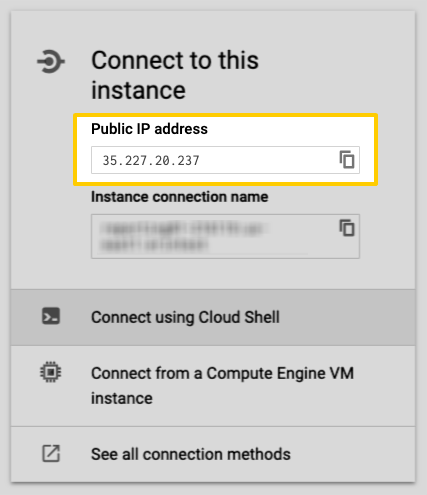
In this step, you’ll locate the Google CloudSQL PostgreSQL database’s public IP address in the Google Cloud Platform console. This will be used to complete the setup in Stitch.
- In the CloudSQL Instances page, locate the instance you want to connect to Stitch.
- When the instance’s Overview page displays, scroll down to the Connect to this instance section.
- Locate the Public IP address field.
- Copy and paste the public IP address into a text file or leave this page open and open your Stitch account in another tab.
Step 3.2: Define the database connection details in Stitch
- If you aren’t signed into your Stitch account, sign in now.
-
On the Stitch Dashboard page, click the Add Integration button.
- Locate and click the Google CloudSQL PostgreSQL icon.
-
Fill in the fields as follows:
-
Integration Name: Enter a name for the integration. This is the name that will display on the Stitch Dashboard for the integration; it’ll also be used to create the schema in your destination.
For example, the name “Stitch Google CloudSQL PostgreSQL” would create a schema called
stitch_google_cloudsql_postgresqlin the destination. Note: The schema name cannot be changed after the integration is saved. -
Host (Endpoint): Enter the host address (endpoint) of your Google CloudSQL PostgreSQL instance. This will be the value of the Public IP address that you retrieved in Step 3.1.
-
Port: Enter the port used by the instance. The default is
5432. -
Username: Enter the Stitch Google CloudSQL PostgreSQL database user’s username.
-
Password: Enter the password for the Stitch Google CloudSQL PostgreSQL database user.
-
Database: Enter the name of the Google CloudSQL PostgreSQL database you want to connect to Stitch. Stitch will ‘find’ all databases you give the Stitch user access to - a default database is only used to complete the connection. This is required for Google CloudSQL PostgreSQL integrations.
-
Include PostgreSQL schema names in destination tables: Checking this setting will include schema names from the source database in the destination table name - for example:
<source_schema_name>__<table_name>.Stitch loads all selected replicated tables to a single schema, preserving only the table name. If two tables canonicalize to the same name - even if they’re in different source databases or schemas - name collision errors can arise. Checking this setting can prevent these issues.
Note: This setting can not be changed after the integration is saved. Additionally, this setting may create table names that exceed your destination’s limits. For more info, refer to the Database Integration Table Name Collisions guide.
-
Step 3.3: Create a replication schedule
In the Replication Frequency section, you’ll create the integration’s replication schedule. An integration’s replication schedule determines how often Stitch runs a replication job, and the time that job begins.
Google CloudSQL PostgreSQL integrations support the following replication scheduling methods:
-
Advanced Scheduling using Cron (Enterprise plans only)
To keep your row usage low, consider setting the integration to replicate less frequently. See the Understanding and Reducing Your Row Usage guide for tips on reducing your usage.
Step 4: Select data to replicate
The last step is to select select the tables and columns you want to replicate.
When you track a table, you’ll also need to define its Replication Method and, if using Key-based Incremental Replication, its Replication Key.
You can select tables and columns by:
- In the Integration Details page, click the Tables to Replicate tab.
- Locate a table you want to replicate.
- Click the checkbox next to the object’s name. A green checkmark means the object is set to replicate.
- If there are child objects, they’ll automatically display and you’ll be prompted to select some.
-
After you set a table to replicate, the Settings page will display. Note: When you track a table, by default all columns will also be tracked.
-
In the Settings page, define the table’s Replication Method and, if using Key-based Incremental Replication, its Replication Key.
-
Repeat this process for every table you want to replicate.
- Click the Finalize Your Selections button to save your data selections.
Initial and historical replication jobs
After you finish setting up Google CloudSQL PostgreSQL, its Sync Status may show as Pending on either the Stitch Dashboard or in the Integration Details page.
For a new integration, a Pending status indicates that Stitch is in the process of scheduling the initial replication job for the integration. This may take some time to complete.
Initial replication jobs with Anchor Scheduling
If using Anchor Scheduling, an initial replication job may not kick off immediately. This depends on the selected Replication Frequency and Anchor Time. Refer to the Anchor Scheduling documentation for more information.
Free historical data loads
The first seven days of replication, beginning when data is first replicated, are free. Rows replicated from the new integration during this time won’t count towards your quota. Stitch offers this as a way of testing new integrations, measuring usage, and ensuring historical data volumes don’t quickly consume your quota.
| Related | Troubleshooting |
Questions? Feedback?
Did this article help? If you have questions or feedback, feel free to submit a pull request with your suggestions, open an issue on GitHub, or reach out to us.