This integration is certified by Stitch. For support, contact Stitch support.
Amazon Microsoft SQL Server RDS feature snapshot
A high-level look at Stitch's Amazon Microsoft SQL Server RDS (v06-01-2016) integration, including release status, useful links, and the features supported in Stitch.
| STITCH | |||
| Release Status |
Released |
Supported By | |
| Stitch Plan |
Free |
Supported Versions |
2000 through 2016 |
| CONNECTION METHODS | |||
| SSH Connections |
Supported |
SSL Connections |
Supported |
| REPLICATION SETTINGS | |||
| Anchor Scheduling |
Unsupported |
Advanced Scheduling |
Unsupported |
| Table-level Reset |
Supported |
Configurable Replication Methods |
Supported |
| REPLICATION METHODS | |||
| Log-based Replication |
Unsupported |
Key-based Replication |
Supported |
| Full Table Replication |
Supported |
||
| DATA SELECTION | |||
| Table Selection |
Supported |
Column Selection |
Supported |
| View Replication |
Supported |
||
| TRANSPARENCY | |||
| Extraction Logs |
Unsupported |
Loading Reports |
Supported |
Connecting Amazon Microsoft SQL Server RDS
Amazon Microsoft SQL Server RDS setup requirements
To set up Amazon Microsoft SQL Server RDS in Stitch, you need:
-
Privileges in Amazon Web Services (AWS) that allow you to:
- Create/manage Security Groups, which is required to whitelist Stitch’s IP addresses.
- View database details, which is required for retrieving the database’s connection details.
-
Privileges in Amazon Microsoft SQL Server RDS that allow you to create/manage users. This is required to create the Stitch database user.
-
A database that uses case-insensitive collation. Refer to Microsoft’s documentation for more info.
Step 1: Configure database connection settings
In this step, you’ll configure the database server to allow traffic from Stitch to access it. There are two ways to connect your database:
- A direct connection will work if your database is publicly accessible.
- An SSH tunnel is required if your database isn’t publicly accessible. This method uses a publicly accessible instance, or an SSH server, to act as an intermediary between Stitch and your database. The SSH server will forward traffic from Stitch through an encrypted tunnel to the private database.
Click the option you’re using below and follow the instructions.
For Stitch to successfully connect with your database instance, you’ll need to add our IP addresses to the appropriate Security Group via the AWS management console.
Security Groups must reside in the same VPC as the instance. Use the instructions below to create a security group for Stitch and grant access to the VPC.
- Log into your AWS account.
- Navigate to the Security Group Management page, typically Services > Compute > EC2.
- Click the Security Groups option, under Network & Security in the menu on the left side of the page.
- Click Create Security Group.
- In the window that displays, fill in the fields as follows:
- Security group name: Enter a unique name for the Security Group. For example:
Stitch - Description: Enter a description for the security group.
- VPC: Select the VPC that contains the database you want to connect to Stitch. Note: The Security Group and database must be in the same VPC, or the connection will fail.
- Security group name: Enter a unique name for the Security Group. For example:
- In the Inbound tab, click Add Rule.
- Fill in the fields as follows:
- Type: Select
Custom TCP Rule - Port Range: Enter the port your database uses. (
1433by default) -
CIDR, IP or Security Group: Enter one of the IP addresses listed below:
-
52.23.137.21/32
-
52.204.223.208/32
-
52.204.228.32/32
-
52.204.230.227/32
-
- Type: Select
- Click Add Rule to add an additional Inbound rule.
-
Repeat steps 6-8 until all the IP addresses above have been added:
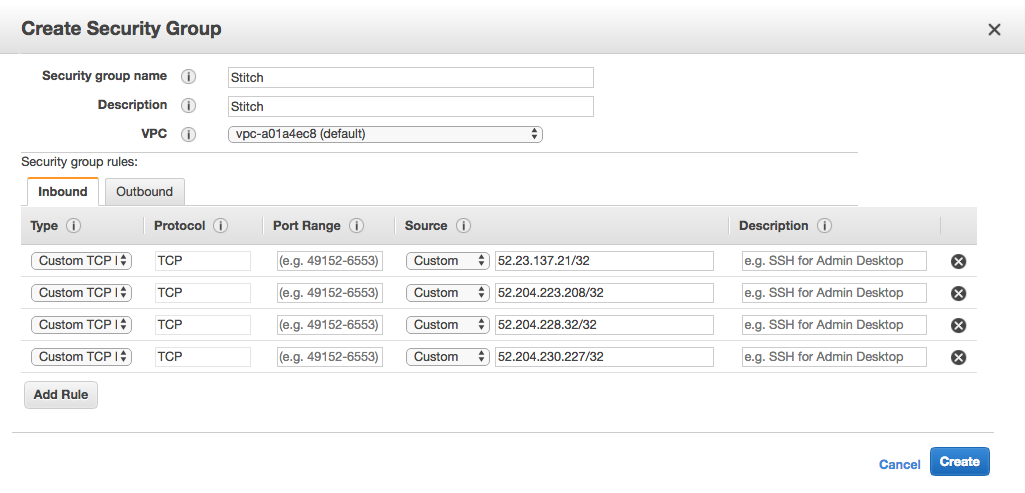
- When finished, click Create to create the Security Group.
- Follow the steps in the Setting up an SSH Tunnel for a database in Amazon Web Services guide to set up an SSH tunnel for Amazon Microsoft SQL Server RDS.
- Complete the steps in this guide after the SSH setup is complete.
Step 2: Create a Stitch database user
Next, you’ll create a dedicated database user for Stitch. This will ensure Stitch is visible in any logs or audits, and allow you to maintain your privilege hierarchy.
us_english. Issues with replication may arise if a different setting is used.
-
Create the Stitch database user, replacing
<database_name>with the name of the database and<password>with a secure password:USE <database_name> CREATE LOGIN <stitch_username> WITH PASSWORD='<password>' CREATE USER <stitch_username> FOR LOGIN -
Grant the Stitch user
SELECTprivileges. To grantSELECTprivileges to all tables in the database, run this command:GRANT SELECT to <stitch_username>If you want to limit the Stitch user to specific tables, run this command instead:
GRANT SELECT ON <schema_name>.<table_name> TO <stitch_username>
See the Privileges list tab for an explanation of why these permissions are required by Stitch.
In the table below are the database user privileges Stitch requires to connect to and replicate data from a Amazon Microsoft SQL Server RDS database.
| Privilege name | Reason for requirement |
| SELECT |
Required to select rows from tables in a database. |
| VIEW CHANGE TRACKING |
Required to use Log-based Incremental Replication. Required to obtain change tracking information from tables where change tracking is enabled. |
Step 3: Connect Stitch
In this step, you’ll complete the setup by entering the database’s connection details and defining replication settings in Stitch.
Step 3.1: Locate RDS connection details in AWS
- Sign into the AWS Console, if needed.
- Navigate to the RDS option.
-
On the RDS Dashboard page, click the Databases option on the left side of the page. This will open the RDS Databases page.
- In the list of databases, locate and click on the instance you want to connect to Stitch. This will open the Database Details page.
Step 3.2: Define the database connection details
- If you aren’t signed into your Stitch account, sign in now.
-
On the Stitch Dashboard page, click the Add Integration button.
- Locate and click the Microsoft SQL Server icon.
-
Fill in the fields as follows:
-
Integration Name: Enter a name for the integration. This is the name that will display on the Stitch Dashboard for the integration; it’ll also be used to create the schema in your destination.
For example, the name “Stitch Amazon Microsoft SQL Server RDS” would create a schema called
stitch_amazon_microsoft_sql_server_rdsin the destination. Note: The schema name cannot be changed after the integration is saved. -
Host (Endpoint): Paste the Endpoint address from the Amazon Microsoft SQL Server RDS Details page in AWS into this field. Don’t include the port number, if it’s appended to the end of the endpoint string - this will cause errors.
-
Port: Enter the port used by the instance. The default is
1433. -
Username: Enter the Stitch Amazon Microsoft SQL Server RDS database user’s username.
-
Password: Enter the password for the Stitch Amazon Microsoft SQL Server RDS database user.
-
Database: Optional: Enter the name of the default database Stitch will connect to. Stitch will ‘find’ all databases you give the Stitch user access to - a default database is only used to test and complete the connection.
-
Step 3.3: Define the SSH connection details
If you’re using an SSH tunnel to connect your Amazon Microsoft SQL Server RDS database to Stitch, you’ll also need to define the SSH settings. Refer to the Setting up an SSH Tunnel for a database in Amazon Web Services guide for assistance with completing these fields.
- Click the Encryption Type menu.
-
Select SSH to display the SSH fields.
-
Fill in the fields as follows:
-
Remote Address: Paste the Public DNS of the SSH sever (EC2 instance) into this field. Refer to the Amazon SSH guide for instructions on retrieving this info.
-
SSH Port: Enter the SSH port of the SSH server (EC2 instance) into this field. This will usually be
22. -
SSH User: Enter the Stitch Linux (SSH) user’s username.
-
Step 3.4: Define the SSL connection details
Click the Connect using SSL checkbox if you’re using an SSL connection. Note: The database must support and allow SSL connections for this setting to work correctly.
Step 3.5: Create a replication schedule
In the Replication Frequency section, you’ll create the integration’s replication schedule. An integration’s replication schedule determines how often Stitch runs a replication job, and the time that job begins.
Amazon Microsoft SQL Server RDS integrations support the following replication scheduling methods:
To keep your row usage low, consider setting the integration to replicate less frequently. See the Understanding and Reducing Your Row Usage guide for tips on reducing your usage.
Step 3.6: Save the integration
When finished, click Save Integration.
Stitch will perform a connection test to the Amazon Microsoft SQL Server RDS database; if successful, a Success! mesage will display at the top of the screen. Note: This test may take a few minutes to complete.
Step 4: Select data to replicate
The last step is to select select the tables and columns you want to replicate.
When you track a table, you’ll also need to define its Replication Method and, if using Key-based Incremental Replication, its Replication Key.
You can select tables and columns by:
- In the Integration Details page, click the Tables to Replicate tab.
- Locate a table you want to replicate.
- Click the checkbox next to the object’s name. A green checkmark means the object is set to replicate.
- If there are child objects, they’ll automatically display and you’ll be prompted to select some.
-
After you set a table to replicate, the Settings page will display. Note: When you track a table, by default all columns will also be tracked.
-
In the Settings page, define the table’s Replication Method and, if using Key-based Incremental Replication, its Replication Key.
- Repeat this process for every table you want to replicate.
Initial and historical replication jobs
After you finish setting up Amazon Microsoft SQL Server RDS, its Sync Status may show as Pending on either the Stitch Dashboard or in the Integration Details page.
For a new integration, a Pending status indicates that Stitch is in the process of scheduling the initial replication job for the integration. This may take some time to complete.
Initial replication jobs with Anchor Scheduling
If using Anchor Scheduling, an initial replication job may not kick off immediately. This depends on the selected Replication Frequency and Anchor Time. Refer to the Anchor Scheduling documentation for more information.
Free historical data loads
The first seven days of replication, beginning when data is first replicated, are free. Rows replicated from the new integration during this time won’t count towards your quota. Stitch offers this as a way of testing new integrations, measuring usage, and ensuring historical data volumes don’t quickly consume your quota.
| Related | Troubleshooting |
Questions? Feedback?
Did this article help? If you have questions or feedback, feel free to submit a pull request with your suggestions, open an issue on GitHub, or reach out to us.