If a database is in private subnet in your Microsoft Azure account, you can use an SSH tunnel to connect Stitch. The approach in this tutorial will use a publicly accessible virtual machine, or SSH server, instance to create the connection. The SSH server will act as an intermediary, forwarding the traffic from Stitch through an encrypted tunnel to the database in the private subnet.
The approach outlined in this guide is applicable to the integrations and destinations listed in the next section.
Before you get started, note that an SSH tunnel isn’t necessarily more secure than a direct connection. An SSH tunnel is only as secure as the monitoring and hardening you perform on the SSH server hosting the tunnel.
If you have questions or concerns about Stitch security, refer to the Security FAQ.
Databases this guide applies to
This guide is applicable to the following integrations and destinations:
| Integrations | Destinations |
For SSH for Amazon-hosted databases, refer to the SSH for Amazon guide.
For SSH for self-hosted databases, refer to the SSH for self-hosted databases guide.
Prerequisites
Privileges in Microsoft Azure that allow you to:
- Create/manage virtual machines. This is required to create the SSH server.
- Create/manage security groups. This is required to enable access between Stitch, the SSH server, and the database.
-
Some familiarity with Linux and the command line. In this tutorial, you’ll create a Linux user for Stitch to ensure access via SSH. While we’ve provided the commands you’ll need to create the user, you should know how to access a server using the command line and feel comfortable running commands.
-
An SSH client, if using a Windows operating system. Some versions of Windows don’t include SSH commands, so you may need to install a Windows-based SSH client before proceeding. Windows 10, however, does include OpenSSH, which is suitable for this tutorial.
Alternatively, you can use the SSH utilities available in Bash in the Azure Cloud Shell. Note that this approach requires an Azure file share and a new storage account. Refer to Microsoft’s documentation for more info.
Step 1: Create and configure a virtual machine
First, you’ll create a virtual machine to serve as the SSH server. This publicly accessible instance will act as an intermediary, forwarding the traffic from Stitch through an encrypted tunnel to your private instance.
Step 1.1: Configure the virtual machine's basic settings
- Log into your Microsoft Azure account.
- In the search bar at the top of the page, type
virtual machines. - Click the Virtual machines result.
- On the Virtual machines page, click the + Add button.
- Fill in the fields in the Basics tab as needed.
- When finished, click the Networking tab.
Step 1.2: Configure the virtual machine's networking settings
Next, you’ll create a network security group that will allow inbound traffic from Stitch’s IP addresses.
- In the Virtual network field, select the virtual network you want to associate with the virtual machine.
- In the Subnet field, select the public subnet you want to associate with the virtual machine.
- In the Public IP field, verify that a value other than None is selected. This is required to allow Stitch to successfully connect to the virtual machine.
- For NIC network security group, select Advanced. This will display the Configure network security group field.
- Click the Create new link under the Configure network security group field. This will open the Create network security group panel.
- In the panel, click the + Add an inbound rule link in the Inbound rules section. This will open the Add inbound security rule panel.
-
Fill in the fields as follows. If a field isn’t in this list, use the default value:
- Source: Select IP Addresses.
-
Source IP addresses/CIDR ranges: Paste this comma-delimited list of Stitch’s IP addresses:
52.23.137.21/32,52.204.223.208/32,52.204.228.32/32,52.204.230.227/32 - Source port ranges: Enter
22. - Protocol: Select TCP.
- Action: Select Allow.
- Name: Enter a name. For example:
stitch-inbound.
Here’s a look at our setup:
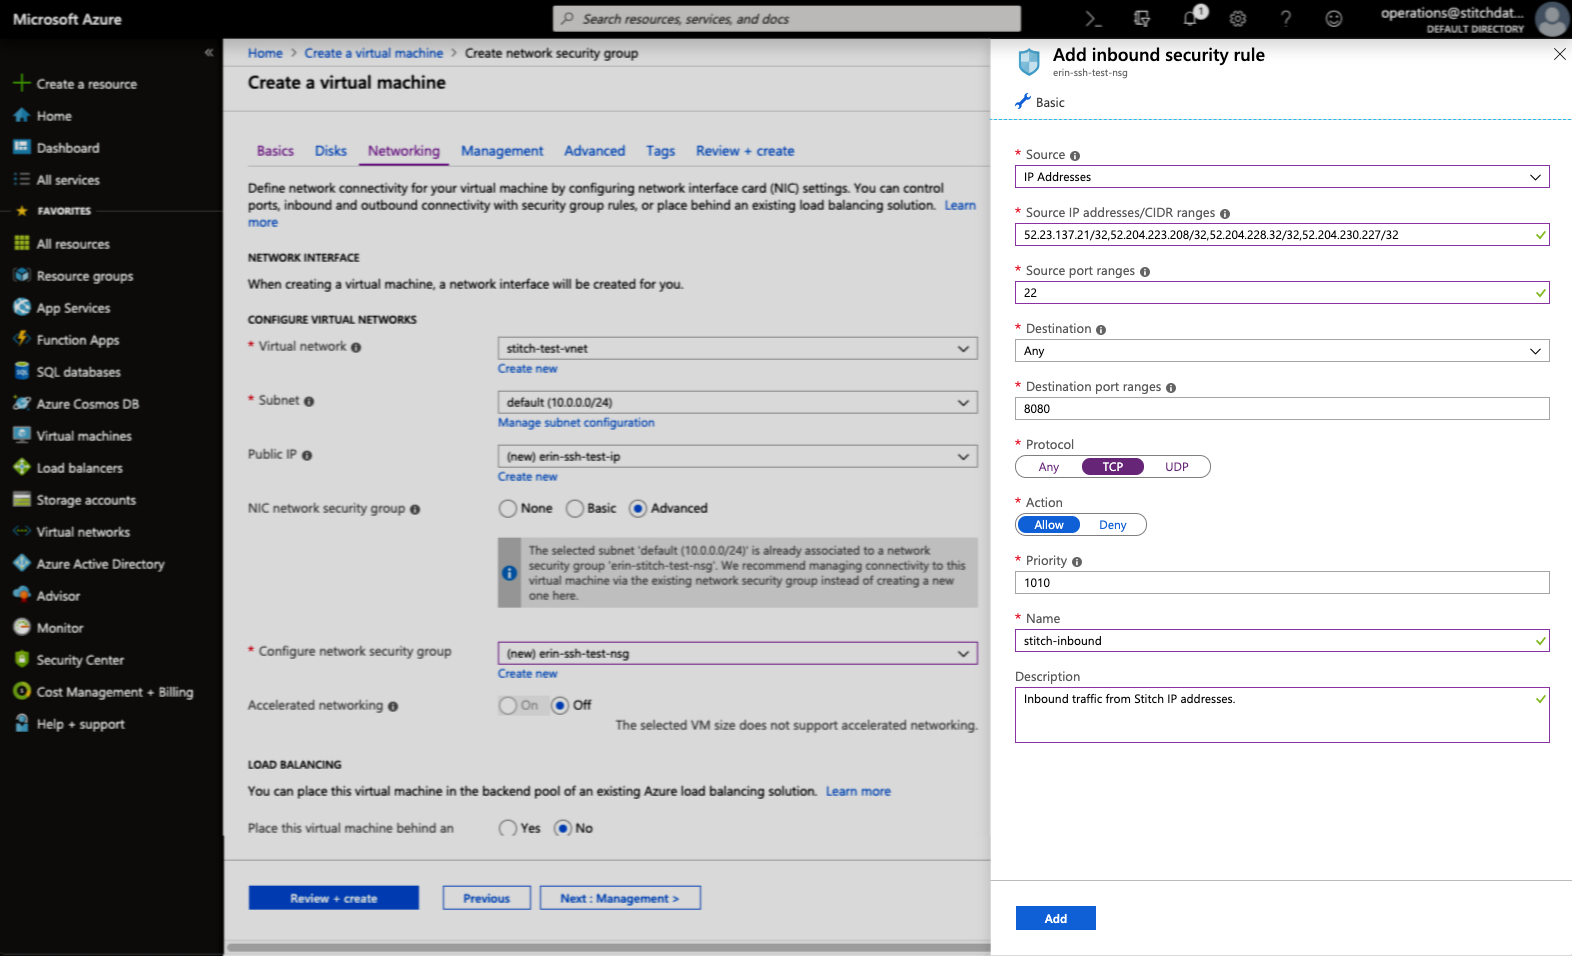
- When finished, click Add to create the inbound rule.
Step 1.3: Launch the virtual machine
- After you’ve finished configuring the virtual machine’s networking settings, click the Review + create tab.
- Review the settings for the virtual machine, verifying that the Public IP field is not None.
- Click Create to launch the virtual machine.
After you click Create, Azure will launch the deployment process for the virtual machine. This may take a few minutes to complete.
Step 2: Enable the SSH server to access the database
Next, you’ll configure the database to allow traffic forwarded from the virtual machine to access the database server. This is accomplished by whitelisting the virtual machine’s private IP address in the server’s firewall settings.
Step 2.1: Retrieve the SSH server's connection details
In this step, you’ll retrieve the SSH server’s public and private IP addresses. The private IP address will be used in the next step, whereas the public IP address will be used to complete the setup in Stitch.
- In the sidenav, click Virtual machines.
- In the search bar at the top of the page, type
virtual machines. - Click the Virtual machines result.
- In the list of available virtual machines, click the one you created in Step 1. This will open the instance’s details page.
-
Locate the Public IP address and Private IP address fields, which are highlighted in the image below:
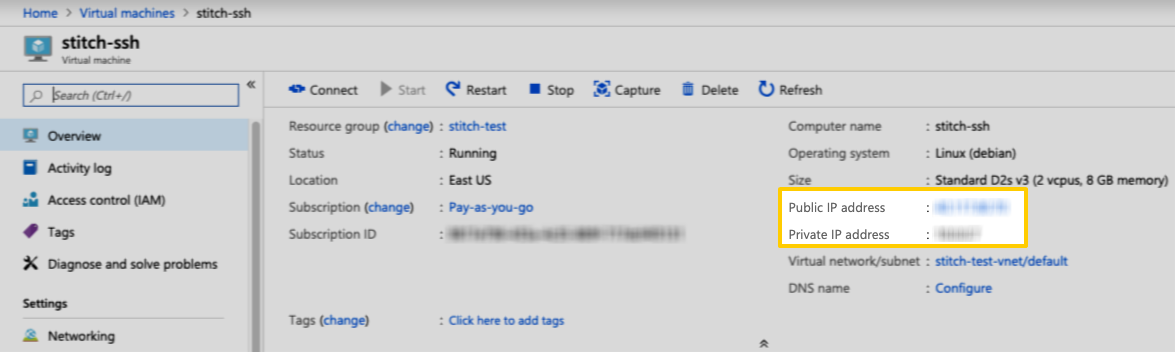
Copy the IP addresses somewhere handy, making sure to note which is public and which is private. Confusing these values will lead to an unsuccessful connection in Stitch.
Step 2.2: Create a server firewall rule for the virtual machine
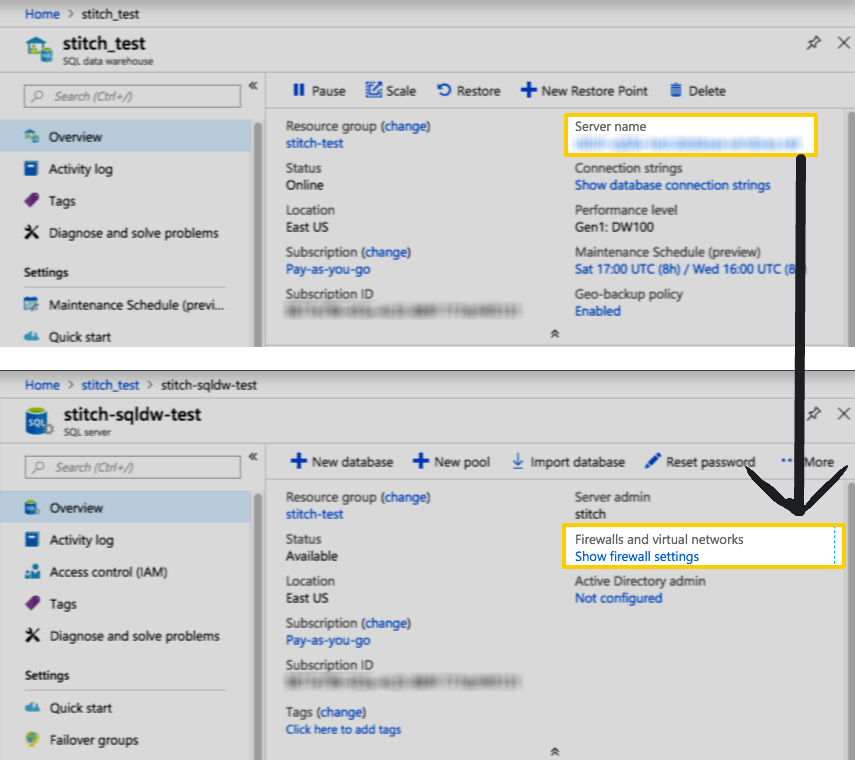
- In the sidenav, click SQL databases.
- On the page that displays, click the name of the database you want to connect to Stitch.
- The details page for the database will display. Click the link in the Server name field.
-
The details page for the server will display. Click the Show firewall settings link in the Firewalls and virtual networks field.
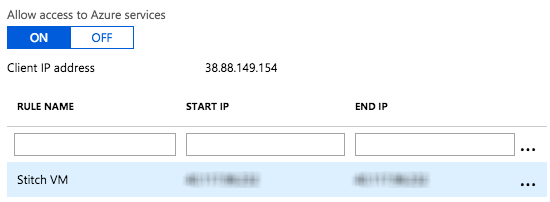
- Create a rule for the virutal machine’s IP address:
- Rule name: Enter a name for the rule. For example:
Stitch VM - Start IP: Paste the virtual machine’s private IP address.
- End IP: Paste the virtual machine’s private IP address again.
Below is what the rule should look like when finished:
- Rule name: Enter a name for the rule. For example:
- Click Save.
Step 3: Retrieve your Public Key
The Stitch public key is used to authorize the Stitch SSH user. This key is specific to your Stitch account.
Note: If the key isn’t properly installed, Stitch will be unable to access your database.
To retrieve your public key, use the instructions below:
- Sign into your Stitch account.
- Next:
-
For new integrations: Click Add Integration, locate the type of database you’re connecting on the Integrations page, and click its icon.
-
For existing integrations: Locate and click the integration on the Stitch Dashboard page, then click the Settings tab.
-
-
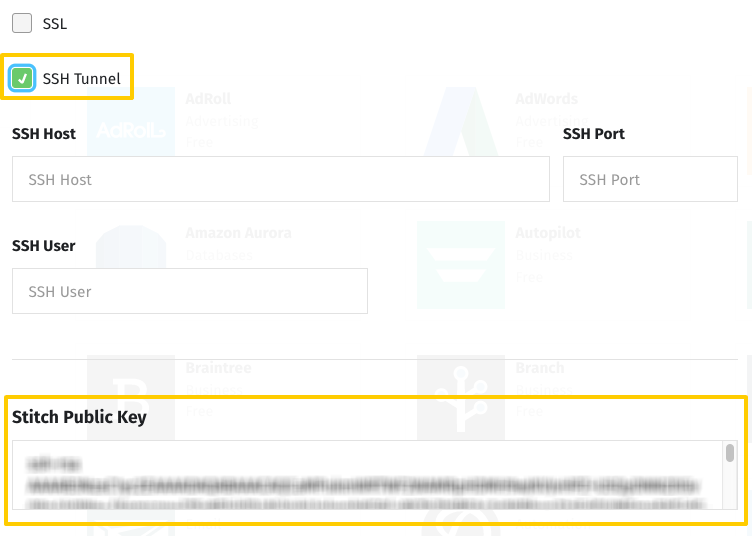
In the Integration Settings page, you’ll see one of two options:
- SSH Tunnel: Click the checkbox to display the SSH fields.
- Encryption Type: Click the dropdown and select the SSH Tunnel option to display the SSH fields.
- Locate the Public Key field.
Leave this page open for now - you’ll need it the next step.
- Sign into your Stitch account.
- Click the Destination tab at the top of the page.
- Click the icon of the destination you’re connecting.
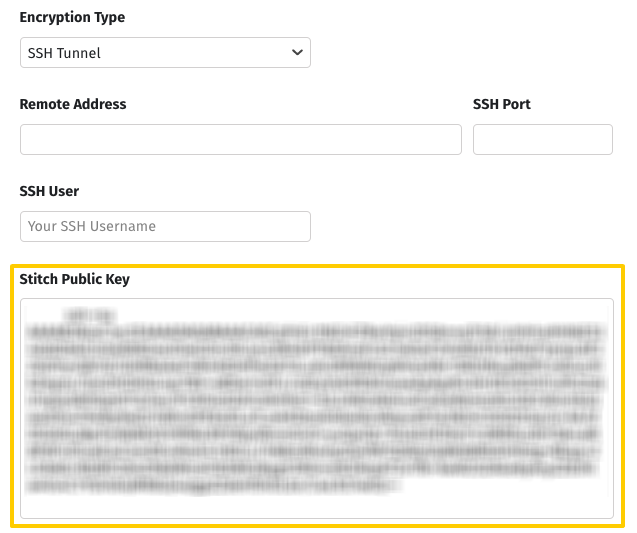
- In the Destination Settings page, click the Encryption Type menu, then the SSH Tunnel option. This will display the SSH fields.
-
In the Integration Settings page, you’ll see one of two options:
- SSH Tunnel: Click the checkbox to display the SSH fields.
- Encryption Type: Click the dropdown and select the SSH Tunnel option to display the SSH fields.
- Locate the Public Key field.
Leave this page open for now - you’ll need it the next step.
Step 4: Create the Stitch SSH user
Next, you’ll create a Stitch user on the SSH server. This will allow Stitch to authenticate via a public key and connect to the server.
-
Open a new terminal window and log into your SSH server.
-
Create a group named
stitch:sudo groupadd stitch -
Create a user named
stitch:sudo useradd -m -g stitch stitch -
Switch to the
stitchuser:sudo su - stitch -
Create the
.sshdirectory:mkdir ~/.ssh -
Using
chmod, alter the permissions of the directory to allow access:chmod 700 ~/.ssh -
Navigate to the
.sshdirectory:cd ~/.ssh -
Using
touch, create theauthorized_keysfile:touch authorized_keys -
Set the permissions for
authorized_keys:chmod 600 authorized_keys -
Import the Stitch public key into
authorized_keys, replacing<PUBLIC KEY>with the public key. Verify after replacing the key that it is on one line and doesn’t contain line breaks:echo "<PUBLIC KEY>" >> ~/.ssh/authorized_keys
Step 5: Complete the setup for Stitch
The last step is to complete the setup steps required to connect the database to Stitch. The instructions vary from database to database, and whether the database is an integration (where data is extracted) or a destination (where data is loaded).
Note: Amazon-based databases aren’t listed as this guide isn’t applicable to them. Refer to the Setting up an SSH Tunnel for a database in Amazon Web Services guide for more info.
| Related | Troubleshooting |
Questions? Feedback?
Did this article help? If you have questions or feedback, feel free to submit a pull request with your suggestions, open an issue on GitHub, or reach out to us.